


Note: This is also posted on my other Greencoal blogs, useful for reference as I do edits on these other blogs too.
Bloggers find the blog post quick edit icon and wrench a great time-saver when they edit their blog. However, each time Firefox is upgraded the blog post edit pencil icon goes missing! * Arrggh * There are several causes, amongst which are possibly the anti-virus software setting. Example: in FF9 I investigated and switched off website filtering, and the pencil icon was restored on my blog posts! Other times it could be a security setting in your browser. The article below is a good read on the issue:
Blogger-edit-pencil-missing
UPDATE: 02-Feb 2012
I upgraded to FF ver 10 last nght, and sure enough, the pencil icon went awry! I tried the previous tweak but it did not work.
After spending the better part of the day googling and investigating the possible myriad causes, including resetting browser preferences, none of which worked, I decided to see what would happen if I closed and shutdown my anti-virus software.
After shutting down the AV program I closed firefox and re-open the browser again. And lo and behold - the pencil icon was restored! So my anti-virus program (always) was the culprit. But didn't I disable web-filtering in the anti-virus program? Yes, I did - but that didn't restore the pencil or edit wrench icon! I needed to shutdown the anti-virus program to restore the pencil icon. I also re-activated the anti-virus program; the edit-pencil icon still shows on the blog! Good.
To re-check, I shut down Firefox and re-open it again. The pencil icon still shows! Somehow, somewhere, something was broken in the AV program setting. Shutting it down and re-opening it was the only way to restore its setting and the pencil edit icon.
Showing posts with label How-To. Show all posts
Showing posts with label How-To. Show all posts


Blog Video Player
Most blogs embed the Youtube player to publish videos on their blog. Problem is, that player publishes videos that are hosted on Youtube. What if I wish to showcase my own video production on my Blog? To do that I would first need to publish my video on Youtube, then embed the Youtube player (linked to my video) on the blog page, a tedium at best. * yawn * I don't need to do that if I have my own video-player widget on my blog. Hence this post to test the concept. And it works !
Now I have the best of both worlds: my own video for readers of this Blog only or publish the video on Youtube if I need to attract a bigger audience. Independence does make you feel good, doesn't it? * grin *


Here's the implementation : Echo - We Are Here!
Issues : This will be a continual update as more issues are found..
a. To play the video in full screen, hit the full-screen icon at the bottom right corner of the video box. Hitting the [ESC] key will return you to the blog page. That works in Google Chrome and IE9 but not in Firefox due to cross-platform inconsistencies. If you use Firefox please right-click and select Full-screen to play the video full-screen.
b. Why do you omit ogg format? Only 2 formats - mmp4 & webM - are served, voiding the need to convert mp4 to ogg, saving conversion time and DropBox folder space. I omitted ogg to see if FF will play webM. Apparently FF ver 10 does play webM but not mp4 yet. Maybe I should i/c ogg for those using ff 9 and below? hmmm...Seems vid fallback to Flash is not needed if only using Chrome, FF, or IE9 as this vid will play on these platforms.
c. Why don't you i/c Flash fallback? I could. Problem is, vid controls are inconsistent across platforms as the Flash player has a different menu bar and the goal is to achieve consistent cross-platform performance as much as possible. My post Video for Everybody shows the menu control using a Flash fallback (youtube player) and no javascript is used. So, some trade-off here.
d. Why then don't you use VfE exclusively? I could. Problem is, without javascript the menu control is inconsistent across different platforms.
e. Video volume level may be adjusted, either on the video control-bar or via the external volume control of the PC speaker.
f. In IE9 some elements on the blog page overlay the video when you play it in full-screen mode. That ruin the presentation somewhat. Still no luck trying to figure out what causes the overlay in IE9. As the issue occur only for this vid player but not in Youtube embedded vids, the problem has to be either HTML5, the Flash player used, the vid menubar control or some incorrect setting. Note that this video displays properly without any disturbing overlay element in Firefox or Chrome browser. Any ideas, anyone?
UPDATE 08-Feb-12: My AV probably is the culprit, figuring out which setting causes the problem in IE9 and not in the other browser platforms. Turned off AV web filter. Issue solved in blog DC.
UPDATE 09-Feb-12: Arrgghh.. although blog DC doesn't surface the overlay issue now I discovered blogs Shunfoto ("SF") and Forgive Me Lord ("FML") still do. More testing - probably has to do with the CSS code in SP and FML? * sigh *.
g. Why does the video takes some time to load? If you're not using high-speed broadband the video will take >5 sec to load. Other factors are also involved - available bandwidth, congestion, etc. I converted all my vids to full HD format - resolution 1920x1200, 3-4 min run time, 35MB file size - because bigger file sizes and Full HD is the future. Owing to their much larger file sizes, full HD vids take longer to load than SD videos. If your bandwidth is not up to it the video will stutter in the first few seconds. After that play should be smooth, hopefully. * grin *
If you're not on the nationwide fibre-optic network, I suggest you get a subscription plan. Superspeed fibre broadband is now price competitive to Singtel's ADSL or Starhub's Cable broadbands. I'm on M1 paying $39 pm (promotional offer) for download and upload speed of upto 50Mbps. Even as I write, ultra-speed fibre broadband is becoming available in many countries today. Ultra-speed broadband will become the de-facto standard as more people ( i.e. congestion ) get on the Internet and multimedia continues to hog the screen - be it on the desktop PC, iPad, iPhone, Ultrabooks. Gasp! Yes, even become mainstream on the living room TV as multimedia technologies converge and merge. TV as we know it today will no longer exist - the Internet is the new TV. That's the new paradigm.
Already the next exciting prospect for multimedia is here: Thunderbolt, the blazingly fast file transfer and streaming made possible by Intel's latest innovation announced last year and is expected to be in the market some time in 2012! Apple had a minor role in Thunderbolt and already launched new Thunderbolt-equipped devices in Dec 2011!
Incidentally, Thunderbolt is also a paradigm shift, spawning new devices and technologies and changing the PC industry. It will make today's PC obsolete. PCs will come modular, heat inside the new PC will no longer be an issue as power, graphics, etc will become externalized. That allows higher clock-speeds and processing power and everything will shrink. Graphics will either be enshrined in the CPU or be externalized, the new PC will take tablet form with built-in screen - like the iPAD - but will be as powerful as desktop PCs today. Storage of programs, data, etc using the Cloud will be pre-dominant, obviating the need for local hard disks on the new PC which will be equipped with light weight (modular or built-in) SSDs. All these technologies are already here, Thunderbolt will tie all these disparate technologies together to make possible the new format, perhaps as soon as within 3-5 years.
Everything will go on the Net - healthcare, education, homework, officework, entertainment, police patrols, security survillence, home automation, etc. Internet hotspots will proliferate, merge, become ubiquitous. Entire communities will have free access to public broadband networks when governments ( yes, free access except Singapore * wink-wink * ) realize the Net is the new TV to communicate with the masses. Books, bookstores, newspapers, magazines, public libraries will be obsolete - as dead as the Dodo. That is the future - and ultra-speed broadband is an indispensable cog in that future.
I didn't hesitate to subscribe when fibre-optic broadband became available in Singapore in 2010. I assume most of you are already on the highspeed bandwagon because - like me - you saw how enjoyable and good Youtube vids really are in full HD glory!
Update 08-Feb-12: Google lays new fibre-optic cable for Super-Fast Internet. Read here.


Now I have the best of both worlds: my own video for readers of this Blog only or publish the video on Youtube if I need to attract a bigger audience. Independence does make you feel good, doesn't it? * grin *
Here's the implementation : Echo - We Are Here!
Issues : This will be a continual update as more issues are found..
a. To play the video in full screen, hit the full-screen icon at the bottom right corner of the video box. Hitting the [ESC] key will return you to the blog page. That works in Google Chrome and IE9 but not in Firefox due to cross-platform inconsistencies. If you use Firefox please right-click and select Full-screen to play the video full-screen.
- Update 5-Feb-12 : That is no longer true. As of today the full-screen icon is now shown at the bottom right corner of the vid box too.
b. Why do you omit ogg format? Only 2 formats - mmp4 & webM - are served, voiding the need to convert mp4 to ogg, saving conversion time and DropBox folder space. I omitted ogg to see if FF will play webM. Apparently FF ver 10 does play webM but not mp4 yet. Maybe I should i/c ogg for those using ff 9 and below? hmmm...Seems vid fallback to Flash is not needed if only using Chrome, FF, or IE9 as this vid will play on these platforms.
c. Why don't you i/c Flash fallback? I could. Problem is, vid controls are inconsistent across platforms as the Flash player has a different menu bar and the goal is to achieve consistent cross-platform performance as much as possible. My post Video for Everybody shows the menu control using a Flash fallback (youtube player) and no javascript is used. So, some trade-off here.
d. Why then don't you use VfE exclusively? I could. Problem is, without javascript the menu control is inconsistent across different platforms.
e. Video volume level may be adjusted, either on the video control-bar or via the external volume control of the PC speaker.
f. In IE9 some elements on the blog page overlay the video when you play it in full-screen mode. That ruin the presentation somewhat. Still no luck trying to figure out what causes the overlay in IE9. As the issue occur only for this vid player but not in Youtube embedded vids, the problem has to be either HTML5, the Flash player used, the vid menubar control or some incorrect setting. Note that this video displays properly without any disturbing overlay element in Firefox or Chrome browser. Any ideas, anyone?
UPDATE 08-Feb-12: My AV probably is the culprit, figuring out which setting causes the problem in IE9 and not in the other browser platforms. Turned off AV web filter. Issue solved in blog DC.
UPDATE 09-Feb-12: Arrgghh.. although blog DC doesn't surface the overlay issue now I discovered blogs Shunfoto ("SF") and Forgive Me Lord ("FML") still do. More testing - probably has to do with the CSS code in SP and FML? * sigh *.
g. Why does the video takes some time to load? If you're not using high-speed broadband the video will take >5 sec to load. Other factors are also involved - available bandwidth, congestion, etc. I converted all my vids to full HD format - resolution 1920x1200, 3-4 min run time, 35MB file size - because bigger file sizes and Full HD is the future. Owing to their much larger file sizes, full HD vids take longer to load than SD videos. If your bandwidth is not up to it the video will stutter in the first few seconds. After that play should be smooth, hopefully. * grin *
If you're not on the nationwide fibre-optic network, I suggest you get a subscription plan. Superspeed fibre broadband is now price competitive to Singtel's ADSL or Starhub's Cable broadbands. I'm on M1 paying $39 pm (promotional offer) for download and upload speed of upto 50Mbps. Even as I write, ultra-speed fibre broadband is becoming available in many countries today. Ultra-speed broadband will become the de-facto standard as more people ( i.e. congestion ) get on the Internet and multimedia continues to hog the screen - be it on the desktop PC, iPad, iPhone, Ultrabooks. Gasp! Yes, even become mainstream on the living room TV as multimedia technologies converge and merge. TV as we know it today will no longer exist - the Internet is the new TV. That's the new paradigm.
Already the next exciting prospect for multimedia is here: Thunderbolt, the blazingly fast file transfer and streaming made possible by Intel's latest innovation announced last year and is expected to be in the market some time in 2012! Apple had a minor role in Thunderbolt and already launched new Thunderbolt-equipped devices in Dec 2011!
Incidentally, Thunderbolt is also a paradigm shift, spawning new devices and technologies and changing the PC industry. It will make today's PC obsolete. PCs will come modular, heat inside the new PC will no longer be an issue as power, graphics, etc will become externalized. That allows higher clock-speeds and processing power and everything will shrink. Graphics will either be enshrined in the CPU or be externalized, the new PC will take tablet form with built-in screen - like the iPAD - but will be as powerful as desktop PCs today. Storage of programs, data, etc using the Cloud will be pre-dominant, obviating the need for local hard disks on the new PC which will be equipped with light weight (modular or built-in) SSDs. All these technologies are already here, Thunderbolt will tie all these disparate technologies together to make possible the new format, perhaps as soon as within 3-5 years.
Everything will go on the Net - healthcare, education, homework, officework, entertainment, police patrols, security survillence, home automation, etc. Internet hotspots will proliferate, merge, become ubiquitous. Entire communities will have free access to public broadband networks when governments ( yes, free access except Singapore * wink-wink * ) realize the Net is the new TV to communicate with the masses. Books, bookstores, newspapers, magazines, public libraries will be obsolete - as dead as the Dodo. That is the future - and ultra-speed broadband is an indispensable cog in that future.
I didn't hesitate to subscribe when fibre-optic broadband became available in Singapore in 2010. I assume most of you are already on the highspeed bandwagon because - like me - you saw how enjoyable and good Youtube vids really are in full HD glory!
Update 08-Feb-12: Google lays new fibre-optic cable for Super-Fast Internet. Read here.
Block Unwanted Ads and Intrusions
Source: Blocking Unwanted Ads on Your Site
ADS, pop-ups and malware are so pervasive and rampant. They are intrusive and annoying, and interfere with your web surfing.
To remove these intrusions, the link above provides the full info on how to block unwanted ads and other pests from intruding on your web site. Here's a summary of what-to-do:
Download the HOSTS File provided at the link. The file contains addresses of link ads mapped to your local host 127.0.0.1. When Windows checks the Hosts file before it queries the DNS servers, it sees the 127.0.0.1 address and thinks the ad link is local, bypassing it and going onto the next mapping on the list. Open the hosts file to check out the ad links.
Next, go to your Windows folder and look for the existing hosts file at C:\WINDOWS\SYSTEM32\DRIVERS\ETC.
Open the downloaded Hosts file in your usual text editor and copy the contents.
Then open your existing hosts file and 'paste' the contents from the downloaded Hosts file, taking care not to disrupt or delete your existing mappings. Save the new Hosts file (overwriting the existing hosts file - make a backup copy first!) and exit. Vist a website and check that unwanted ads are blocked.
Important Note: Youtube vids are stopped from playing on your web site due to the 'no-cookie' tag. Simply remove the tag from the vid link and the vid should play.
Example: This vid below will not play: [If it plays it's bcoz I restored the original window host file.]
QUOTE
UNQUOTE
Simply change "www.youtube-nocookie.com" to "www.youtube.com" in the embed code, and the amended script should play:
***
You can also use a HOSTS file to block ads, banners, 3rd party Cookies, 3rd party page counters, web bugs, and even most hijackers. This is accomplished by blocking the connection(s) that supplies these unwanted links.
Explanation - the following entry 127.0.0.1 ad.doubleclick.net blocks all files supplied by that DoubleClick Server to the web page you are viewing. This also prevents the server from tracking your movements. Why? ... because in certain cases "Ad Servers" like Doubleclick (and many others) will try silently to open a separate connection on the webpage you are viewing, record your movements then yes ... follow you to additional sites you may visit.
In many cases using a well designed HOSTS file can speed the loading of web pages by not having to wait for these ads, annoying banners, hit counters, etc. to load. This also helps to protect your Privacy and Security by blocking sites that may track your viewing habits, also known as "click-thru tracking" or Data Miners. Although using a HOSTS file is not a cure-all against all the dangers on the web, it does provide an effective "Layer of Protection".
Pricelessware has named the MVPS HOSTS file as "the best of the best in Freeware" for the 2nd time!
To view the HOSTS file in plain text form open with Notepad or Ultraedit Editor. If your existing Hosts File already contains code to prevent certain program updates or checks, you would need to "cut-and-paste" from the downloaded HOSTS file in order not to disrupt the existing status quo of the existing hosts file.
There is no need to turn on, adjust or change any settings. Windows automatically looks for the existence of a HOSTS file and if found, checks the HOSTS file first for entries to the web page you just requested. The 127.0.0.1 is considered the location of your computer, so when the entry (example) "ad.doubleclick.net" is requested your computer thinks 127.0.0.1 is the location of the file. When this file is not located it skips onto the next file and thus the ad server is blocked from loading the banner, Cookie, or some unscrupulous ActiveX, or javascript file.
In case you're wondering... this all happens in microseconds, which is much faster than trying to fetch a file half-way around the world. Another great feature of the HOSTS file is that it is a two-way file, meaning if some malware does get into your system (usually bundled with other products) the culprit can not get out (call home) as long as the necessary entries exist. This is why it's important to keep your HOSTS file up-to-date.
ADS, pop-ups and malware are so pervasive and rampant. They are intrusive and annoying, and interfere with your web surfing.
To remove these intrusions, the link above provides the full info on how to block unwanted ads and other pests from intruding on your web site. Here's a summary of what-to-do:
Download the HOSTS File provided at the link. The file contains addresses of link ads mapped to your local host 127.0.0.1. When Windows checks the Hosts file before it queries the DNS servers, it sees the 127.0.0.1 address and thinks the ad link is local, bypassing it and going onto the next mapping on the list. Open the hosts file to check out the ad links.
Next, go to your Windows folder and look for the existing hosts file at C:\WINDOWS\SYSTEM32\DRIVERS\ETC.
Open the downloaded Hosts file in your usual text editor and copy the contents.
Then open your existing hosts file and 'paste' the contents from the downloaded Hosts file, taking care not to disrupt or delete your existing mappings. Save the new Hosts file (overwriting the existing hosts file - make a backup copy first!) and exit. Vist a website and check that unwanted ads are blocked.
Important Note: Youtube vids are stopped from playing on your web site due to the 'no-cookie' tag. Simply remove the tag from the vid link and the vid should play.
Example: This vid below will not play: [If it plays it's bcoz I restored the original window host file.]
QUOTE
UNQUOTE
Simply change "www.youtube-nocookie.com" to "www.youtube.com" in the embed code, and the amended script should play:
***
You can also use a HOSTS file to block ads, banners, 3rd party Cookies, 3rd party page counters, web bugs, and even most hijackers. This is accomplished by blocking the connection(s) that supplies these unwanted links.
Explanation - the following entry 127.0.0.1 ad.doubleclick.net blocks all files supplied by that DoubleClick Server to the web page you are viewing. This also prevents the server from tracking your movements. Why? ... because in certain cases "Ad Servers" like Doubleclick (and many others) will try silently to open a separate connection on the webpage you are viewing, record your movements then yes ... follow you to additional sites you may visit.
In many cases using a well designed HOSTS file can speed the loading of web pages by not having to wait for these ads, annoying banners, hit counters, etc. to load. This also helps to protect your Privacy and Security by blocking sites that may track your viewing habits, also known as "click-thru tracking" or Data Miners. Although using a HOSTS file is not a cure-all against all the dangers on the web, it does provide an effective "Layer of Protection".
Pricelessware has named the MVPS HOSTS file as "the best of the best in Freeware" for the 2nd time!
To view the HOSTS file in plain text form open with Notepad or Ultraedit Editor. If your existing Hosts File already contains code to prevent certain program updates or checks, you would need to "cut-and-paste" from the downloaded HOSTS file in order not to disrupt the existing status quo of the existing hosts file.
There is no need to turn on, adjust or change any settings. Windows automatically looks for the existence of a HOSTS file and if found, checks the HOSTS file first for entries to the web page you just requested. The 127.0.0.1 is considered the location of your computer, so when the entry (example) "ad.doubleclick.net" is requested your computer thinks 127.0.0.1 is the location of the file. When this file is not located it skips onto the next file and thus the ad server is blocked from loading the banner, Cookie, or some unscrupulous ActiveX, or javascript file.
In case you're wondering... this all happens in microseconds, which is much faster than trying to fetch a file half-way around the world. Another great feature of the HOSTS file is that it is a two-way file, meaning if some malware does get into your system (usually bundled with other products) the culprit can not get out (call home) as long as the necessary entries exist. This is why it's important to keep your HOSTS file up-to-date.
Article Index: How To
How to Choose: ID / Contractor
How to Choose: Cooker Hood
How to Choose: Air Conditioner
How to Choose: Kitchen Taps
How to Choose: Kitchen Worktops
How to Renovate Your Home
How to Plan Your Kitchen
How to Light Up your Living Space
How to Create a Clutter-free PC Desktop
How to Ensure Proper Installation of Toilet Bowl
Coming soon!
How to Choose: Windows
How to Invest in Properties
How to Invest in Listed Stocks
How to Choose: Cooker Hood
How to Choose: Air Conditioner
How to Choose: Kitchen Taps
How to Choose: Kitchen Worktops
How to Renovate Your Home
How to Plan Your Kitchen
How to Light Up your Living Space
How to Create a Clutter-free PC Desktop
How to Ensure Proper Installation of Toilet Bowl
Coming soon!
How to Choose: Windows
How to Invest in Properties
How to Invest in Listed Stocks
How to Create Clutter-free PC Desktop
Preamble
I am surprised my post titled "Clutter-free PC Desktop" still attracts a fair amount of interest from readers.
Problem is, you need to click a link that takes you to another blog - Nikon Workshop - as my article was posted there. Yes, you guessed it: I am the author of Nikon Workshop too. Some of you are photo fanatics like I am. That's why I may bring some posts on that blog to this blog to make it more convenient for you to access. That will be a future project. Well, for now I will bring only this post, revamped a bit, to show you how to create a clutter-free desktop.
Oh-oh..but what has a Clutter-free PC Desktop gotta do with this blog? Well, since we spend a prodigious amount of time on the office-and-home PC, seeing our PC Desktop clutter-free may inspire and remind us to keep our home(s) clutter-free too! The real deal is I wanted to put up a post on how to keep the home clutter-free.
But that takes time, a lot of time. Aside from ideas I have, I need to research the Net for relevant useful info and advice. Especially as searches serve up countless junk pages that require me to sift and wade through before I could get info relevant to my subject.
Hopefully, a post on my clutter-free desktop may serve up Google ads that make it easier to locate more info. Some links provide useful articles, other links provide ads that have relevant info, as explained in-depth in my blog post.
+++
Here's the tutorial on the Clutter-Free PC Desktop.
The Desktop is usually cluttered with a lot of icons. The objective of this
exercise is to move all those icons onto a toolbar (called the desktop toolbar) that you place either at the top or side of your screen display. You then select and set a high-resolution image as the monitor screen background.
Thus there is a toolbar called 'desktop toolbar' that displays the icons, and there is a Desktop that refers to your monitor display. Confusing, isn't it - who else always does that, but MS Windows ?! *grin*
So you have the Desktop or screen display and the Desktop Toolbar aka the desktop widget that is initially hidden in the Toolbar menu, until you bring it up and display at the side or top of the display screen. Got that?
Step 1 - Clear the Desktop of all icons.
Right-click anywhere on the your PC monitor screen, then click on Arrange Icons By and uncheck Show Desktop Icons on the drop-down menu. Once you uncheck Show Desktop Icons all the icons will disappear on the screen display aka Desktop. See the picture below:
Clutter-free Desktop

Clear desktop of icons
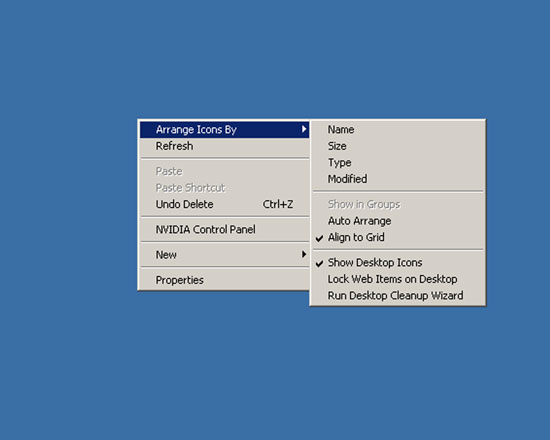
Note the above screen capture had the Show Desktop Icons checked, which meant the icons were displayed on the desktop. I cheated, and cropped the icons out of the screen capture ! But you get the idea, right?
Step 2 - Desktop Toolbar
Once you have cleared the desktop, the next step is to unhide or display the desktop toolbar.
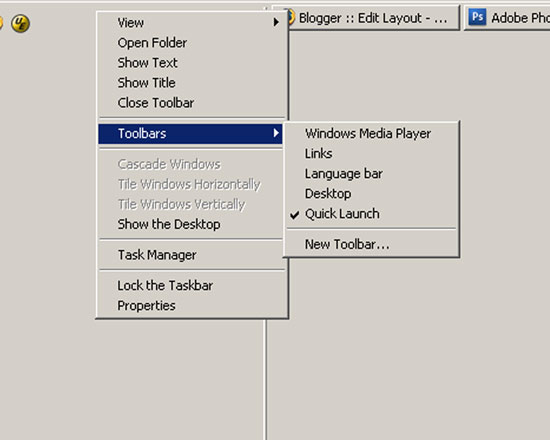
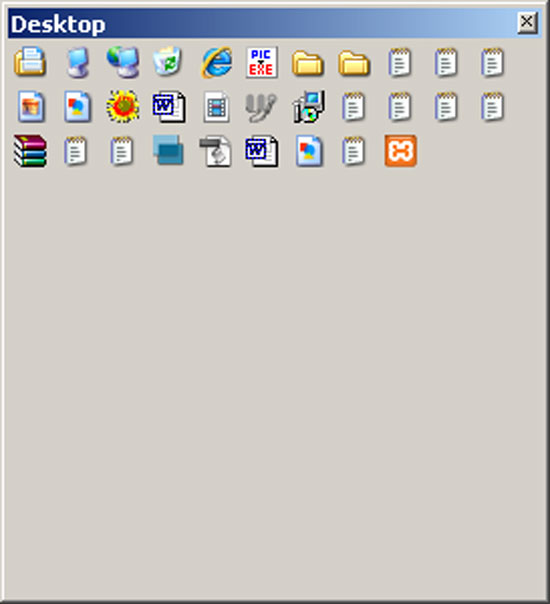
Go to the toolbar at the bottom of the screen, right-click on an empty space near the time display, select Toolbars on the pop-up menu, and check Desktop on the drop-down menu. That will unhide the desktop toolbar or widget. When you complete that step, a desktop widget will appear on the horizontal toolbar next to the time display area.
Select Toolbars-->Check Desktop
Desktop Widget
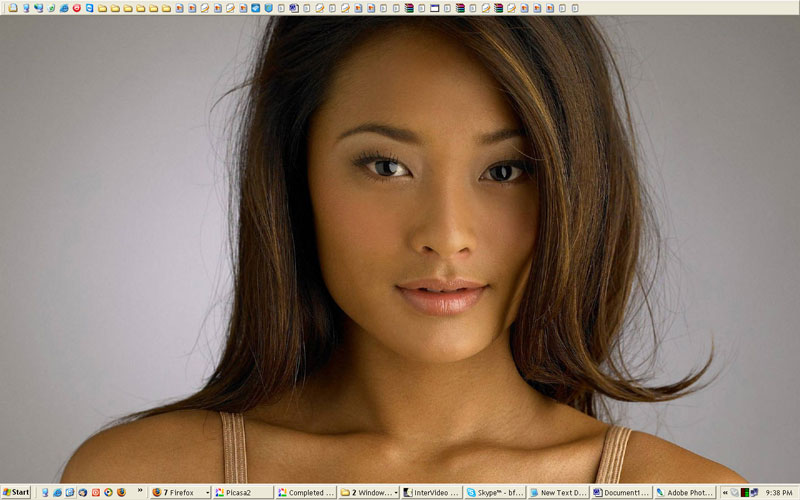
You then drag that desktop widget and place it either at the side or top of the display screen, like so:
Desktop toolbar placed at the side of the screen display

Finally, open (simply double-click on the file) any high-resolution image you like, right-click on the image that is opened, and click on Set as Desktop Background.
Another Desktop Photo
If you like, you may wish to download a high-resolution 1280x1024 px image of the pretty Thai actress below as your desktop image. Simply right-click on the image and click "Set as (Desktop) Background..". The photo was shot by my dear wife at a marriage function in Thailand and copyright-owned by her. I didn't watermark our Copyright on the photo as it is meant to be for your private use - on your PC desktop. Nevertheless, please respect the Copyright and do not flog the image around on the Net, ok?

I am surprised my post titled "Clutter-free PC Desktop" still attracts a fair amount of interest from readers.
Problem is, you need to click a link that takes you to another blog - Nikon Workshop - as my article was posted there. Yes, you guessed it: I am the author of Nikon Workshop too. Some of you are photo fanatics like I am. That's why I may bring some posts on that blog to this blog to make it more convenient for you to access. That will be a future project. Well, for now I will bring only this post, revamped a bit, to show you how to create a clutter-free desktop.
Oh-oh..but what has a Clutter-free PC Desktop gotta do with this blog? Well, since we spend a prodigious amount of time on the office-and-home PC, seeing our PC Desktop clutter-free may inspire and remind us to keep our home(s) clutter-free too! The real deal is I wanted to put up a post on how to keep the home clutter-free.
Hopefully, a post on my clutter-free desktop may serve up Google ads that make it easier to locate more info. Some links provide useful articles, other links provide ads that have relevant info, as explained in-depth in my blog post.
+++
Here's the tutorial on the Clutter-Free PC Desktop.
The Desktop is usually cluttered with a lot of icons. The objective of this
Thus there is a toolbar called 'desktop toolbar' that displays the icons, and there is a Desktop that refers to your monitor display. Confusing, isn't it - who else always does that, but MS Windows ?! *grin*
So you have the Desktop or screen display and the Desktop Toolbar aka the desktop widget that is initially hidden in the Toolbar menu, until you bring it up and display at the side or top of the display screen. Got that?
Step 1 - Clear the Desktop of all icons.
Right-click anywhere on the your PC monitor screen, then click on Arrange Icons By and uncheck Show Desktop Icons on the drop-down menu. Once you uncheck Show Desktop Icons all the icons will disappear on the screen display aka Desktop. See the picture below:
Clutter-free Desktop
Clear desktop of icons
Note the above screen capture had the Show Desktop Icons checked, which meant the icons were displayed on the desktop. I cheated, and cropped the icons out of the screen capture ! But you get the idea, right?
Step 2 - Desktop Toolbar
Once you have cleared the desktop, the next step is to unhide or display the desktop toolbar.
Go to the toolbar at the bottom of the screen, right-click on an empty space near the time display, select Toolbars on the pop-up menu, and check Desktop on the drop-down menu. That will unhide the desktop toolbar or widget. When you complete that step, a desktop widget will appear on the horizontal toolbar next to the time display area.
Select Toolbars-->Check Desktop
Desktop Widget
You then drag that desktop widget and place it either at the side or top of the display screen, like so:
Desktop toolbar placed at the side of the screen display
Finally, open (simply double-click on the file) any high-resolution image you like, right-click on the image that is opened, and click on Set as Desktop Background.
Another Desktop Photo
If you like, you may wish to download a high-resolution 1280x1024 px image of the pretty Thai actress below as your desktop image. Simply right-click on the image and click "Set as (Desktop) Background..". The photo was shot by my dear wife at a marriage function in Thailand and copyright-owned by her. I didn't watermark our Copyright on the photo as it is meant to be for your private use - on your PC desktop. Nevertheless, please respect the Copyright and do not flog the image around on the Net, ok?
The Lighting Plan - How We Did It
Related Posts
1 The Challenge: Warm & Cosy Ambience
2 The Lighting Plan: How We Did It
3 Showcase: Lights
4 More Lights
I was surprised this blog attracts readers from local renovation forums such as MyHomeTown.sg, Renotalk.com, and Punggol.org.
Lighting Plan - Warm & Cosy

After we posted the above photo of our living area, some of you wanted to know how we did the lighting. Well, here's the lighting plan for our living area: how we did it!
The Plan
We wanted our living area to serve two functions: first, to provide a cosy, warm space to entertain guests and for the family to spend quality time together. Such as enjoying a movie on the home theater or watching TV together.
However, on occasions we may need the living space to be generally well-lit, particularly during festive occasions when many guests arrive at the same time.
That meant the light fixtures we buy must provide (1) general lighting and (2) mood lighting - providing a soft, cosy ambiance that is conducive for conversation in a relaxed setting.
Ceiling Light: Nothing fanciful, simple E27 Bulb for LED in future

To achieve general lighting for the living space, we settled on two energy-saving fluorescent bulbs rated at 36 watts each, each giving a brightness equivalent to a 150W incandescent bulb. These energy-savers would be our main ceiling light to provide general lighting for the living space.
We also wanted the ceiling light fixture to be future-proof, as we wished to replace the energy-saving fluorescent bulbs with LED bulbs
in future. That meant we had to settle for the standard E27 bulb socket instead of buying light fixtures - most of which come with proprietary sockets - that would become dated and obsolete when LEDs become the rage in a few years' time. The high-quality 6W Cree LED Light Bulb with E27 socket shown on the left, for instance, supposedly replaces a 60W incandescent bulb! However, we would need several of these LED bulbs to provide sufficient illumination over a large living space. These bulbs generally last 5 to 15 years, consume very little electricity, hence pay for themselves within a short period of time.
Two parallel ceiling strips with E27 CFC Bulbs for future LEDs

We foresee LED bulbs will become mainstream products within the next 5 years, if not sooner. At present we could only get LEDs for wall lights and spot lights locally, not for ceiling lights. Lightcraft stocks several of these LEDs, but prices are generally steep. Perhaps as LED technology matures and consumer demand for home LED lighting grows, prices will drop to more acceptable levels in future.
To supplement the ceiling lights, we installed two Zen-inspired wall lamps - again a minimalist design - from Lightcraft. The wall lamps used 100W halogen bulbs that gave a bright, bluish-while light.
Our Investment Piece: Wall Lamp, Simple yet Beautiful, a classic design!

Zen-inspired Wall Lamps from Japan

Now for the important ambient lighting scheme.
1 The Challenge: Warm & Cosy Ambience
2 The Lighting Plan: How We Did It
3 Showcase: Lights
4 More Lights
I was surprised this blog attracts readers from local renovation forums such as MyHomeTown.sg, Renotalk.com, and Punggol.org.
Lighting Plan - Warm & Cosy
After we posted the above photo of our living area, some of you wanted to know how we did the lighting. Well, here's the lighting plan for our living area: how we did it!
The Plan
We wanted our living area to serve two functions: first, to provide a cosy, warm space to entertain guests and for the family to spend quality time together. Such as enjoying a movie on the home theater or watching TV together.
However, on occasions we may need the living space to be generally well-lit, particularly during festive occasions when many guests arrive at the same time.
That meant the light fixtures we buy must provide (1) general lighting and (2) mood lighting - providing a soft, cosy ambiance that is conducive for conversation in a relaxed setting.
Ceiling Light: Nothing fanciful, simple E27 Bulb for LED in future
To achieve general lighting for the living space, we settled on two energy-saving fluorescent bulbs rated at 36 watts each, each giving a brightness equivalent to a 150W incandescent bulb. These energy-savers would be our main ceiling light to provide general lighting for the living space.
We also wanted the ceiling light fixture to be future-proof, as we wished to replace the energy-saving fluorescent bulbs with LED bulbs
Two parallel ceiling strips with E27 CFC Bulbs for future LEDs
We foresee LED bulbs will become mainstream products within the next 5 years, if not sooner. At present we could only get LEDs for wall lights and spot lights locally, not for ceiling lights. Lightcraft stocks several of these LEDs, but prices are generally steep. Perhaps as LED technology matures and consumer demand for home LED lighting grows, prices will drop to more acceptable levels in future.
To supplement the ceiling lights, we installed two Zen-inspired wall lamps - again a minimalist design - from Lightcraft. The wall lamps used 100W halogen bulbs that gave a bright, bluish-while light.
Our Investment Piece: Wall Lamp, Simple yet Beautiful, a classic design!
Zen-inspired Wall Lamps from Japan
Now for the important ambient lighting scheme.
Directions on Clutter-Free Desktop
Seems readers are intrigued and delighted in a clean layout on the PC display! This article shows how to attain a clutter-free desktop on the PC screen.

To save repetitious emailing of instructions, here's what you have to do to get a clutter-free desktop. But first a bit of terminology:
'Desktop' refers to your PC monitor screen.
'Toolbar' refers to the horizontal bar across your screen bottom.
Clutter-free Desktop
The Desktop is usually cluttered with a lot of icons. The objective of this exercise is to move all those icons onto a toolbar (called the desktop toolbar) that you place either at the top or side of your screen display. You then select and set a high-resolution image as the monitor screen background.
Thus be aware there is a toolbar called 'desktop toolbar' that displays the icons, as distinct from the Desktop that is your monitor display. So you have the Desktop, referring to the monitor screen, and Desktop Toolbar' referring to the desktop toolbar widget that you can place at the side or top of the display screen. Got that?
OK, to clear the Desktop of all icons as in the above picture:
Right-click anywhere on the your PC monitor screen, then click on Arrange Icons By and uncheck Show Desktop Icons on the drop-down menu. See the picture below:
Clear desktop of icons
Once you have cleared the desktop, the next step is to display the desktop toolbar.
Go to the toolbar at the bottom of the screen, right-click on an empty space near the time display, select Toolbars on the pop-up menu, and check Desktop on the drop-down menu. When you complete that step, a desktop widget will appear on the horizontal toolbar next to the time display area.
Select Toolbars-->Check Desktop
Desktop Widget
You then drag that desktop widget and place it either at the side or top of the display screen, like so:
Desktop toolbar placed at the side of the screen display
Finally, open (simply double-click on the file) any high-resolution image you like, right-click on the image that is opened, and click on Set as Desktop Background.
If you like, you may wish to download the 1500x1200 pixel image of the pretty gal shown above as your desktop image. Simply double-click on the image and it will take you to the download location.
To save repetitious emailing of instructions, here's what you have to do to get a clutter-free desktop. But first a bit of terminology:
'Desktop' refers to your PC monitor screen.
'Toolbar' refers to the horizontal bar across your screen bottom.
Clutter-free Desktop
The Desktop is usually cluttered with a lot of icons. The objective of this exercise is to move all those icons onto a toolbar (called the desktop toolbar) that you place either at the top or side of your screen display. You then select and set a high-resolution image as the monitor screen background.
Thus be aware there is a toolbar called 'desktop toolbar' that displays the icons, as distinct from the Desktop that is your monitor display. So you have the Desktop, referring to the monitor screen, and Desktop Toolbar' referring to the desktop toolbar widget that you can place at the side or top of the display screen. Got that?
OK, to clear the Desktop of all icons as in the above picture:
Right-click anywhere on the your PC monitor screen, then click on Arrange Icons By and uncheck Show Desktop Icons on the drop-down menu. See the picture below:
Clear desktop of icons
Once you have cleared the desktop, the next step is to display the desktop toolbar.
Go to the toolbar at the bottom of the screen, right-click on an empty space near the time display, select Toolbars on the pop-up menu, and check Desktop on the drop-down menu. When you complete that step, a desktop widget will appear on the horizontal toolbar next to the time display area.
Select Toolbars-->Check Desktop
Desktop Widget
You then drag that desktop widget and place it either at the side or top of the display screen, like so:
Desktop toolbar placed at the side of the screen display
Finally, open (simply double-click on the file) any high-resolution image you like, right-click on the image that is opened, and click on Set as Desktop Background.
If you like, you may wish to download the 1500x1200 pixel image of the pretty gal shown above as your desktop image. Simply double-click on the image and it will take you to the download location.
How to Rid Smell in Toilet
Today a new plumber came to re-install my toilet bowl.
I had complained of a stench coming from the toilet bowl, particularly from 7-8 AM and around 7-8 pm, coinciding with the time when most residents on the upper floors use their toilet.

Obviously something was very wrong with the installation.
When the first plumber came several weeks ago to install the toilet bowl, I had asked why he did not apply silicone sealant around the rim of the pan collar, before he set down the toilet bowl over the collar.
The pan collar is the piece of plastic that connects the toilet bowl to the sewage pipe on the toilet floor. I had felt that a silicone seal would ensure that no smell escapes from the sewage pipe into the toilet.
The plumber said nonchalantly "nobody does that". I left it at that. He is the plumber and should know better than a layman like me, I thought to myself. How I wished I had been more assertive!
After installation, the toilet smelled for several days. Seemed that each time someone on the upper floors flushed the toilet, the smell would escape into my toilet.
I brought the matter to my ID's attention, and requested another plumber to re-install the toilet bowl. I had lost confidence in the first plumber.
After a lapse of several weeks, the new plumber came.
He was concerned he might chip the spanking new toilet bowl in the removal process. That was the ID's concern, not his, I told him, and in any event I could not live with a smelly toilet! He only needed to exercise care not to cause any chipping, that was all.
I told him what I had suspected to be the cause of the smelly toilet: no silicone seal on the pan collar. He agreed as much, though he was aware some plumbers usually do not apply any silicone to the pan collar and no one had complained of any stench.
He noted I had my air vent pipe removed. He said he had read in the papers that some residents had also complained of a stench in their toilets after the apartment block had been upgraded, particularly where the cast iron sewage pipe had been replaced with a uPVC pipe, so probably the problem had something to do with the removal of the air vent pipe.
The logic escaped me, so I was not persuaded.
The plumber got down to work. He managed to unseat the toilet bowl without damaging it. Well done!
To our surprise we found that the toilet bowl had two rectangular openings measuring about 3-inches square on the back of the toilet bowl chamber.
Ah-ha, so that explained why there was a stench: as there was no silicone seal on the pan collar, the smell escaped from the sewage pipe into the toilet bowl chamber, then through the rectangular openings at the toilet bowl base into the toilet room itself.
....
This is what a pan collar looks like. This one has an 1-inch offset:
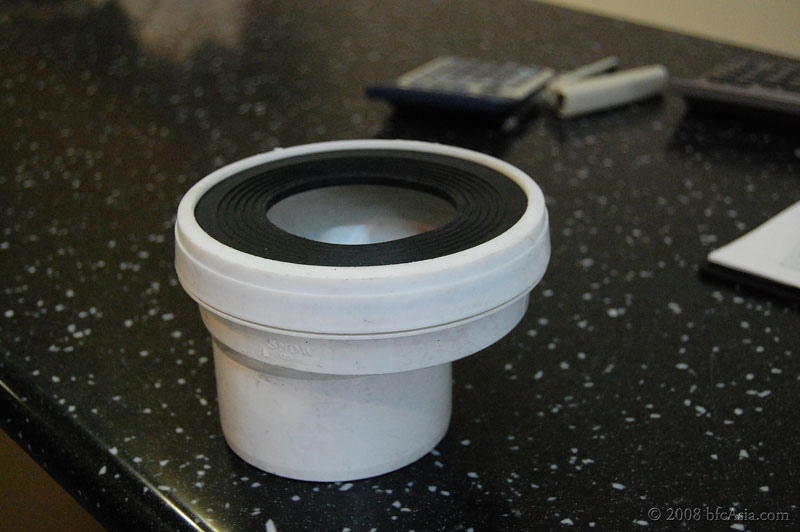
Sewage pipe outlet - bad odor if inserted pan collar is not sealed with silicone

Thirty minutes later, the toilet bowl was seated back onto the pan collar, now with silicone sealant applied around the rim, as well as on the rubber ring, as the plumber felt that perhaps the toilet bowl outlet pipe was a bit small, resulting in the rubber ring making a less-than-perfect seal around the outlet pipe.
The improvement was quite immediate: the smell was perceptively much reduced!
It would probably take a few more days to confirm that the smelly problem has indeed been solved.
ADDENDUM:
It worked!! I was delighted this morning because the toilet for the first time did not smell.
However, sometimes when someone flushes his toilet on the upper floors, pressure is created that can suck water from your toilet bowl into the sewage pipe. When that happens the water level in the bowl will drop so drastically that it leaves a gap in the "S" bend, allowing foul air from the sewage pipe to seep into your toilet.
So if your toilet smells bad, first check there is sufficient water in the toilet bowl. No, not in the cistern but in the toilet bowl itself. This water in the bowl acts as a barrier to foul air from the sewage pipe, and prevents any foul smell entering the toilet through the sewage pipe.
If the water level in the toilet bowl is high enough above the "S" bend, then you should suspect an unsealed pan collar as the culprit for the stink.
Now, what about the report that some people complained their toilets smelled after the HDB upgrading exercise?
I believe that had nothing to do with the replacement of the cast-iron sewage pipe nor with the removal of the air vent pipe. The reason for the stink was very likely due to the bad installation of their toilet bowl. It was likely cracks developed at the cement base of the toilet bowl when the sewage pipe was changed, and because the pan collar of the toilet was not properly sealed, foul air escaped from the sewage system into the toilet.
LESSON LEARNT:
Ensure your plumber applies a silicone seal around the pan collar when he first installs the toilet bowl. That is the proper and correct procedure to install the toilet bowl. In the west plumbers use a wax gasket to ensure an airtight seal between the toilet bowl and the sewage pipe.
Readers will recall that during the 2003 SARS epidermic, it was reported in Hongkong the virus spread from one floor to the floor below via the sewage pipe. Although details were not divulged in the press report, I suspect the leak was caused by improper toilet bowl installation.
When someone flushes his toilet on the upper floors, obviously the foul air carrying viruses and bacteria will be "flushed" into the toilet on the floor below through the unsealed pan collar. Hence the stink.
I would probably have remained ignorant today of how unsanitary my toilet installation was had I not experienced the stinky toilet bowl problem.
Now, even if you have a toilet bowl that is completely sealed so that no air could escape from the chamber once the toilet is cemented to the floor, it is still advisable to ask your plumber to apply silicone sealant to the pan collar. Otherwise you risk allowing viruses to enter your toilet each time someone on the upper floors flushes the toilet.
As we know, cement is porous and over time will develop cracks so that most people will find their toilets stink after some years, especially for those with unsealed pan collars. You can prevent the stink by getting your plumber to apply silicone sealant to the pan collar during the initial installation of the toilet bowl.
Why risk your family's health?
POSTSCRIPT: Public health was at risk so I posted the issue on a forum, see below:
A friend pm'ed me asking why apply silicone sealant when the plumber already used white cement to seal the toilet bowl to the floor?
Well, the silicone sealant is applied to the pan collar -- the piece that is connected to the sewage pipe hole. If the pan collar is not sealed, foul air (and soil too) will seep into yr toilet bowl chamber due to the air presure at work.
Like others, I did not ask my plumber to seal the pan collar when he first installed the bowl. After installation, my toilet smelled badly, particularly when someone on higher floors flushed the toilet.
My toilet was a 1-piece design, and had 2 rectangular holes at the back of the toilet bowl. Hence I could detect the foul smell. More importantly, I realized the risk I was putting my family to, breathing in bad air, particularly bacteria and viruses from sick neighbors upstairs after they had flushed the toilet.
If not for the toilet design I had chosen, I would not have detected the foul smell, and the problem probably would only surface several years later.
You don't get any foul smell if your toilet bowl has no openings and is fully sealed by the white cement onto the floor. But over time the cement will develop tiny cracks, that is when you begin to detect foul smell from the toilet bowl area. That happened to my old toilet (after 5 yrs), although at that time I did not know what caused the bad smell. Maybe the earthquakes from Indonesia over last 2 yrs was a contributory factor, causing tiny cracks in the cement to appear, thereby allowing foul air to seep into the toilet space?
Anyway, when my plumber told me he never applied silicone sealant to the pan collar I realized probably all plumbers in Singapore also install toilet bowls without applying silicone sealant!
That is very unhygienic. Ask yr plumber if that is true. Probably he will tell you he don't use silicone sealant for your toilet bowl's pan collar too.
With unsealed toilet bowls we are probably breathing in all sorts of viruses and bacteria discharged from sick neighbors in the block without knowing it.
The HK health authorities at first were mystified how the SARS virus were spreading in the same apartment block. Finally they traced the spread to faulty sewage pipe.
The authorities did not reveal what caused the leak (in order not to spread public panic) but the culprit was the unsealed toilet bowl that allowed foul air (carrying the virus) to spread from one upper flat to another lower down. If the toilet pipe had merely been leaking water, do you think the affected flat owner would not have noticed that and left the leak unattended? Of course not! So I believe SARS had spread via the unsealed toilet bowl pan collar!
Now that my toilet bowl has been re-installed, there is no more foul smell !
So, please remind yr plumber to apply silicone sealant to the pan collar.
I had complained of a stench coming from the toilet bowl, particularly from 7-8 AM and around 7-8 pm, coinciding with the time when most residents on the upper floors use their toilet.
Obviously something was very wrong with the installation.
When the first plumber came several weeks ago to install the toilet bowl, I had asked why he did not apply silicone sealant around the rim of the pan collar, before he set down the toilet bowl over the collar.
The pan collar is the piece of plastic that connects the toilet bowl to the sewage pipe on the toilet floor. I had felt that a silicone seal would ensure that no smell escapes from the sewage pipe into the toilet.
The plumber said nonchalantly "nobody does that". I left it at that. He is the plumber and should know better than a layman like me, I thought to myself. How I wished I had been more assertive!
After installation, the toilet smelled for several days. Seemed that each time someone on the upper floors flushed the toilet, the smell would escape into my toilet.
I brought the matter to my ID's attention, and requested another plumber to re-install the toilet bowl. I had lost confidence in the first plumber.
After a lapse of several weeks, the new plumber came.
He was concerned he might chip the spanking new toilet bowl in the removal process. That was the ID's concern, not his, I told him, and in any event I could not live with a smelly toilet! He only needed to exercise care not to cause any chipping, that was all.
I told him what I had suspected to be the cause of the smelly toilet: no silicone seal on the pan collar. He agreed as much, though he was aware some plumbers usually do not apply any silicone to the pan collar and no one had complained of any stench.
He noted I had my air vent pipe removed. He said he had read in the papers that some residents had also complained of a stench in their toilets after the apartment block had been upgraded, particularly where the cast iron sewage pipe had been replaced with a uPVC pipe, so probably the problem had something to do with the removal of the air vent pipe.
The logic escaped me, so I was not persuaded.
The plumber got down to work. He managed to unseat the toilet bowl without damaging it. Well done!
To our surprise we found that the toilet bowl had two rectangular openings measuring about 3-inches square on the back of the toilet bowl chamber.
Ah-ha, so that explained why there was a stench: as there was no silicone seal on the pan collar, the smell escaped from the sewage pipe into the toilet bowl chamber, then through the rectangular openings at the toilet bowl base into the toilet room itself.
....
This is what a pan collar looks like. This one has an 1-inch offset:
Sewage pipe outlet - bad odor if inserted pan collar is not sealed with silicone

Thirty minutes later, the toilet bowl was seated back onto the pan collar, now with silicone sealant applied around the rim, as well as on the rubber ring, as the plumber felt that perhaps the toilet bowl outlet pipe was a bit small, resulting in the rubber ring making a less-than-perfect seal around the outlet pipe.
The improvement was quite immediate: the smell was perceptively much reduced!
It would probably take a few more days to confirm that the smelly problem has indeed been solved.
ADDENDUM:
It worked!! I was delighted this morning because the toilet for the first time did not smell.
So if your toilet smells bad, first check there is sufficient water in the toilet bowl. No, not in the cistern but in the toilet bowl itself. This water in the bowl acts as a barrier to foul air from the sewage pipe, and prevents any foul smell entering the toilet through the sewage pipe.
If the water level in the toilet bowl is high enough above the "S" bend, then you should suspect an unsealed pan collar as the culprit for the stink.
Now, what about the report that some people complained their toilets smelled after the HDB upgrading exercise?
I believe that had nothing to do with the replacement of the cast-iron sewage pipe nor with the removal of the air vent pipe. The reason for the stink was very likely due to the bad installation of their toilet bowl. It was likely cracks developed at the cement base of the toilet bowl when the sewage pipe was changed, and because the pan collar of the toilet was not properly sealed, foul air escaped from the sewage system into the toilet.
LESSON LEARNT:
Ensure your plumber applies a silicone seal around the pan collar when he first installs the toilet bowl. That is the proper and correct procedure to install the toilet bowl. In the west plumbers use a wax gasket to ensure an airtight seal between the toilet bowl and the sewage pipe.
Readers will recall that during the 2003 SARS epidermic, it was reported in Hongkong the virus spread from one floor to the floor below via the sewage pipe. Although details were not divulged in the press report, I suspect the leak was caused by improper toilet bowl installation.
When someone flushes his toilet on the upper floors, obviously the foul air carrying viruses and bacteria will be "flushed" into the toilet on the floor below through the unsealed pan collar. Hence the stink.
I would probably have remained ignorant today of how unsanitary my toilet installation was had I not experienced the stinky toilet bowl problem.
Now, even if you have a toilet bowl that is completely sealed so that no air could escape from the chamber once the toilet is cemented to the floor, it is still advisable to ask your plumber to apply silicone sealant to the pan collar. Otherwise you risk allowing viruses to enter your toilet each time someone on the upper floors flushes the toilet.
As we know, cement is porous and over time will develop cracks so that most people will find their toilets stink after some years, especially for those with unsealed pan collars. You can prevent the stink by getting your plumber to apply silicone sealant to the pan collar during the initial installation of the toilet bowl.
Why risk your family's health?
POSTSCRIPT: Public health was at risk so I posted the issue on a forum, see below:
A friend pm'ed me asking why apply silicone sealant when the plumber already used white cement to seal the toilet bowl to the floor?
Well, the silicone sealant is applied to the pan collar -- the piece that is connected to the sewage pipe hole. If the pan collar is not sealed, foul air (and soil too) will seep into yr toilet bowl chamber due to the air presure at work.
Like others, I did not ask my plumber to seal the pan collar when he first installed the bowl. After installation, my toilet smelled badly, particularly when someone on higher floors flushed the toilet.
My toilet was a 1-piece design, and had 2 rectangular holes at the back of the toilet bowl. Hence I could detect the foul smell. More importantly, I realized the risk I was putting my family to, breathing in bad air, particularly bacteria and viruses from sick neighbors upstairs after they had flushed the toilet.
If not for the toilet design I had chosen, I would not have detected the foul smell, and the problem probably would only surface several years later.
You don't get any foul smell if your toilet bowl has no openings and is fully sealed by the white cement onto the floor. But over time the cement will develop tiny cracks, that is when you begin to detect foul smell from the toilet bowl area. That happened to my old toilet (after 5 yrs), although at that time I did not know what caused the bad smell. Maybe the earthquakes from Indonesia over last 2 yrs was a contributory factor, causing tiny cracks in the cement to appear, thereby allowing foul air to seep into the toilet space?
Anyway, when my plumber told me he never applied silicone sealant to the pan collar I realized probably all plumbers in Singapore also install toilet bowls without applying silicone sealant!
That is very unhygienic. Ask yr plumber if that is true. Probably he will tell you he don't use silicone sealant for your toilet bowl's pan collar too.
With unsealed toilet bowls we are probably breathing in all sorts of viruses and bacteria discharged from sick neighbors in the block without knowing it.
The HK health authorities at first were mystified how the SARS virus were spreading in the same apartment block. Finally they traced the spread to faulty sewage pipe.
The authorities did not reveal what caused the leak (in order not to spread public panic) but the culprit was the unsealed toilet bowl that allowed foul air (carrying the virus) to spread from one upper flat to another lower down. If the toilet pipe had merely been leaking water, do you think the affected flat owner would not have noticed that and left the leak unattended? Of course not! So I believe SARS had spread via the unsealed toilet bowl pan collar!
Now that my toilet bowl has been re-installed, there is no more foul smell !
So, please remind yr plumber to apply silicone sealant to the pan collar.
How to Renovate your Home
Read Up & Do Research Before You Choose Your ID
Think about it. You don't have much time once you start your ID search. The ID will push you to make a quick decision. If you make a hasty decision you may end up with a nightmare ID/Contractor! So first do your due diligence research.
What Research Must I Do?
1 How to Renovate Your Home
2 How to Choose: ID / Contractor
3 How to Choose: Cooker Hood
4 How to Choose: Air Conditioner
5 How to Choose: Kitchen Taps
6 How to Choose: Kitchen Worktops
7 How to Plan Your Kitchen
8 How to Light Up your Living Space
9 How to Ensure Proper Installation of Toilet Bowl
10 How to Create a Clutter-free PC Desktop
Coming soon!
How to Choose: Windows
How to Invest in Properties
How to Invest in Listed Stocks
Think about it. You don't have much time once you start your ID search. The ID will push you to make a quick decision. If you make a hasty decision you may end up with a nightmare ID/Contractor! So first do your due diligence research.
What Research Must I Do?
- Read up forumers' experiences with their IDs. An excellent forum is Renotalk. Other good forums are MyHomeTown.sg, Punggol.com and Sengkang.com. Get an overview of what's happening.
- Don't blindly follow forumers' ID recommendation. Some posts may be fraudulent. Either made by IDs posing as forumers. Or made by home owners paid by their IDs to say good things about them.
- That's why I am reluctant to recommend my ID. If you pm'ed me for my ID, I will simply oblige you out of courtesy. But please understand giving you the contact does not mean I endorse or recommend him.
- Read "How to Choose ID/Contractor" and related posts on this blog.
- Get quotations from IDs you've short-listed. Compare them against promotional offers either directly solicited by you or through ID sites. Knowing what others offer help you in your negotiations with your ID.
- Be aware though the ID may not use a standard quotation format as a tactic to make direct comparisons difficult. To counter that, break down your ID quote into itemized costs. Compare against other forumers' itemized costs. If you wish, you may submit your ID's itemized costs in our format to help build a database of itemized costs. Over time we'll have a database of itemized costs that'll help readers to make useful comparisons.
- Some ID firms use Google Ads to advertise their packages and promotional offers that appear on this Blog. Such ads usually appear inside blog pages such as "How to Choose ID/Contractor". This saves you valuable time searching for local ID firms on the Net.
- Before renovation starts, research appliances, fixtures and fittings that you intend to install, such as burner hobs, cooker hood, oven, ceiling & wall lights, etc. These fixtures will impact your home design and costs. If you makes changes after you've accepted the ID's quotation, he may use that as an excuse to charge additional costs. Or even if he wants to allow changes, it may be too late.
- An example is my experience in "FX-900: Butting the Head". I decided to buy the Fujioh hood after renovation had already started! By then, it was too late for my ID to make changes as the factory had already made the kitchen cabinets to standard dimensions. Likewise, also the acrylic worktop that had to be cast-and-pressured produced to fit my kitchen length.
- Don't forget to research materials too. Such as marble, granite, compressed stone, ceramic tiles, laminated tiles or other materials for your flooring. Or for worktops - do you go for solid wood worktops from Ikea, generic acrylic or branded worktops such as Dupont's Corian, Formica's Acryliss, etc? Obviously you need to research and decide on these before renovation begins.
- Again, save time researching by accessing my series on "How To Choose" and "Reviews" to serve up Google ads that may provide useful & relevant info in your research. Sometimes sites apparently not connected to your search may have info that is useful e.g. I was researching on granite worktops and came across a Dupont Corian ad. Accessing that site gave me tips on general worktop maintenance and care - just what I was researching for!
- HOT TIP! For even quicker research, use the "Search My Blog" box on my home page for your searches. Google will serve ads that have direct, immediate relevance to your search. If you use the normal google search box on your browser e.g. search term "sink", you'll have to wade through pages of useless junk before you come across anything useful to your search.This is because Google interprets your searches depending on what you're reading. If you are reading the blog, Google serves ads that are closer to what you are looking for. Doing the same search on yr browser produces results that are more general in nature.
- After you feel you've done enough reading and research, compile a shortlist of IDs you may want to check out further. At this stage you also have an idea of what you want to renovate or change in your home. And list the items, fixtures and fittings you'll likely buy and install.
- Prepare a checklist of questions you'll ask each ID.
- Ask each ID to show you work he's completed or is currently in progress. Be aware he may pass off his colleagues' work - which show better workmanship - as his in order to impress you. You can tell by watching how the owner - if he's present when you visit - or the workers, react and relate to him. Usually I will make surprise site visits alone, by myself, to double-check. But only if I have to e.g. if I've some misgivings about an ID I want to hire but wanna give him a chance. Most IDs are honest, but occasionally you may come across a black sheep. So be prudent.
- HOT TIP! Make friends with fellow forumers who are renovating their homes. Ask to visit their homes whilst under renovation. If you're impressed with the workmanship, ask yr friend for the ID's mobile to ask for quote later, not immediately. Don't show you're impressed. He might be influenced by your enthusiasm to inflate his quotation price! Quietly take photos before you leave the place - this way you're sure he'll use the same subcons he's using for the forumer's reno. Later, when you negotiate, insist the ID hires the same subcons he's using for your friend's reno. Hopefully, that may help you achieve good workmanship. Be aware though other factors also play a role in producing good workmanship.
1 How to Renovate Your Home
2 How to Choose: ID / Contractor
3 How to Choose: Cooker Hood
4 How to Choose: Air Conditioner
5 How to Choose: Kitchen Taps
6 How to Choose: Kitchen Worktops
7 How to Plan Your Kitchen
8 How to Light Up your Living Space
9 How to Ensure Proper Installation of Toilet Bowl
10 How to Create a Clutter-free PC Desktop
Coming soon!
How to Choose: Windows
How to Invest in Properties
How to Invest in Listed Stocks
Subscribe to:
Posts (Atom)

 Posts
Posts


